【Python】bitflyer の Private API を使って資産情報を取得してみる
おはようございます。
昨日に引き続き、Bitflyer の API をいじりたいと思います。
今回は Private API を用いて、個人の情報を取得します。
Bitflyer のアカウントが必要となりますので、お持ちでない方はまずアカウントの作成をお願いします。
プログラムは前回のものを流用します。
【Python】pubnub を使って bitflyer のTicker情報をリアルタイム表示する
スポンサーリンク
APIキーの取得
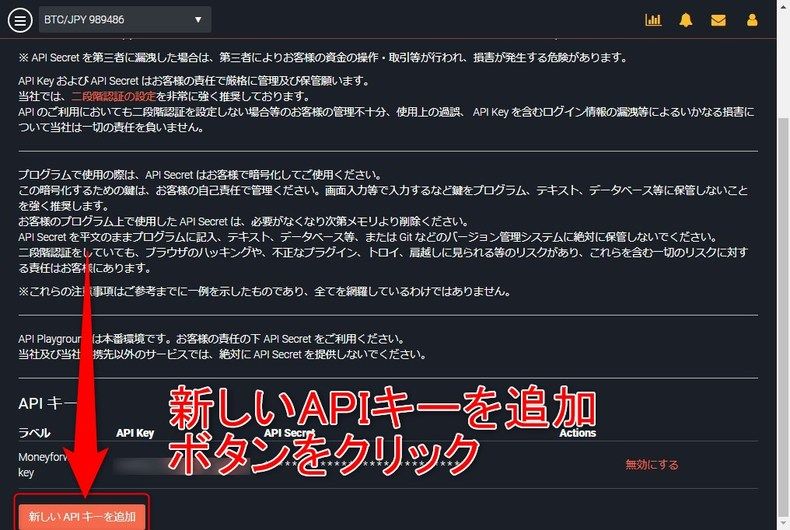
bitflyer にログインし、BitFlyer Lightning の画面を表示したら、左側のサイドメニューを開いて「API」メニューを選択します。
「新しいAPIキーを追加」ボタンをクリックします。
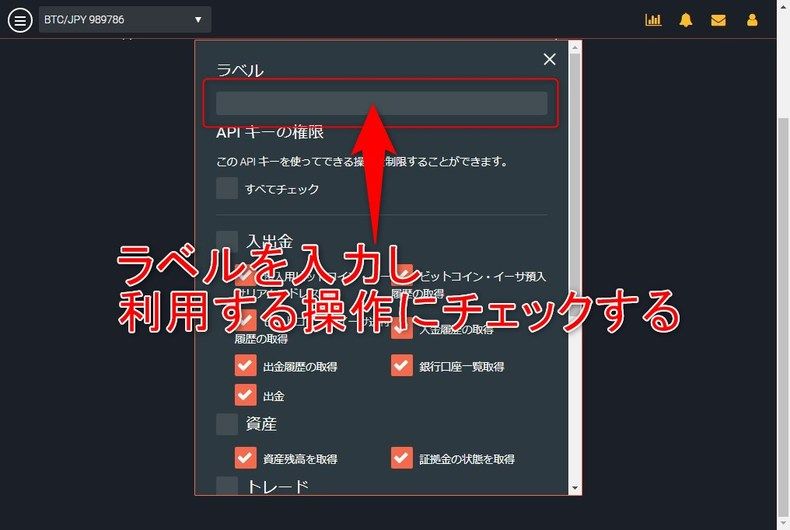
APIキーのラベルを入力、利用する操作にチェックをしたら、下部にある「OK」ボタンをクリックします。
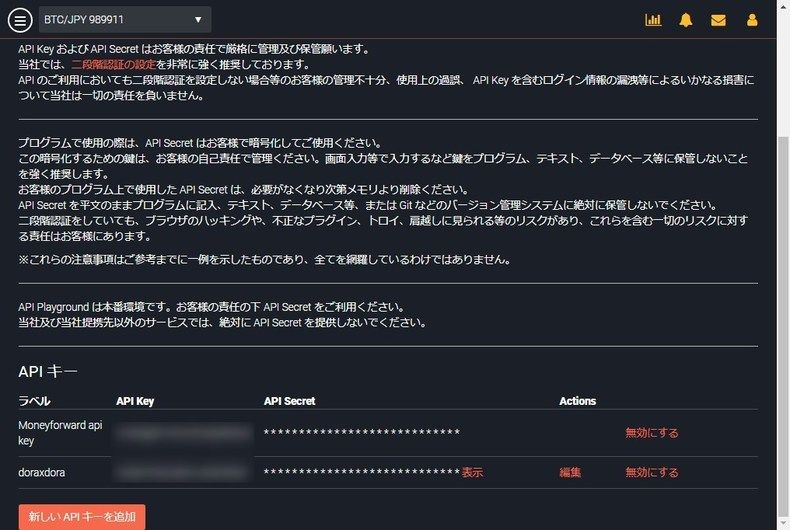
APIキーが追加されるので、「API Key」と「API Secret」を控えます。
※注意書きにもありますが、第3者の目に触れないような管理を、自己責任でお願いします。
画面の修正
index.html
<!DOCTYPE html>
<html>
   <head>
      <title>{{ title }}</title>
      <link rel="stylesheet" href="{{ static_url('css/style.css') }}"/>
      <script type="text/javascript" src="{{ static_url('js/script.js') }}"></script>
      <script type="text/javascript" src="http://ajax.googleapis.com/ajax/libs/jquery/1.7.2/jquery.min.js"></script>
   </head>
   <body>
      <div id="container">
         <div style="clear:both; padding-top:10px;">
            <table id="tickerTable">
               <tr id="header">
                  <th style="width:5%">種別</th>
                  <th style="width:10%">時刻</th>
                  <th style="width:5%">ID</th>
                  <th style="width:5%">売値</th>
                  <th style="width:5%">買値</th>
                  <th style="width:10%">売り数量</th>
                  <th style="width:10%">買い数量</th>
                  <th style="width:10%">売り注文総数</th>
                  <th style="width:10%">買い注文総数</th>
                  <th style="width:10%">最終取引価格</th>
                  <th style="width:10%">出来高</th>
                  <th style="width:10%">価格単位出来高</th>
               </tr>
            </table>
         </div>
         <div style="clear:both; padding-top:10px;">
            <input type="button" value="更新" />
            <table id="balanceTable">
               <tr><th>円</th><td id="jpy"></td></tr>
               <tr><th>ビットコイン</th><td id="btc"></td></tr>
               <tr><th>ビットコインキャッシュ</th><td id="bch"></td></tr>
               <tr><th>イーサ</th><td id="eth"></td></tr>
               <tr><th>イーサクラシック</th><td id="etc"></td></tr>
               <tr><th>ライトコイン</th><td id="ltc"></td></tr>
               <tr><th>モナコイン</th><td id="mona"></td></tr>
               <tr><th>リスク</th><td id="lsk"></td></tr>
            </table>
         </div>
      </div>
   </body>
</html>
style.css
新規追加したテーブルのスタイルを追加
    #balanceTable {
        width: 400px;
    }
    #balanceTable th {
       padding-left:5px;
        text-align: left;
    }
プログラムの修正
script.js
Tickerのテーブルは最大10行までとし、新しく追加したボタンの処理を追加します。
// スクリプト読み込み時の処理
function initialize() {

    addEmptyRow(10);

    updateBalance();

    var connection = new WebSocket('ws://127.0.0.1:8888/ticker');
    connection.onmessage = function (e) {
        var data = JSON.parse(e.data.replace( /\\/g , "" ));

        var table = $("#tickerTable");

        // 日付け変換
        var date = new Date(data.timestamp);
        data.timestamp = date.toLocaleString();

        // テーブルに追加
        var tr = document.createElement("tr");
        $.each(data, function(i, cell){
            var td = document.createElement("td");
            td.innerHTML = cell;
            tr.appendChild(td);
        });
        var rows = table.find("tr");
        if (rows.length > 10) {
            $("#tickerTable tr:last").remove();
        }
        $(tr).insertAfter("#header");

    };
}

/**
 * 空行をテーブルに追加します
 */
function addEmptyRow(rowCount) {

    for (i = 0; i < rowCount; i++) {
        var tr = document.createElement("tr");
        for (j = 0; j < 12; j++) {
            var td = document.createElement("td");
            tr.appendChild(td);
        }
        $(tr).insertAfter("#header");
    }
}

/**
 * 資産情報を更新します.
 */
function updateBalance() {

   $.ajax({
      url: "http://localhost:8888/balance",
      type: "POST",
      success: function(jsonResponse) {
         jsonResponse = jsonResponse.replace( /\\/g , "" );
         var data = JSON.parse(jsonResponse);
         for(row in data) {
             switch (data[row].currency_code) {
                 case "JPY":
                     $("#jpy").text(data[row].amount);
                     break;
                 case "BTC":
                     $("#btc").text(data[row].amount);
                     break;
                 case "BCH":
                     $("#bch").text(data[row].amount);
                     break;
                 case "ETH":
                     $("#eth").text(data[row].amount);
                     break;
                 case "ETC":
                     $("#etc").text(data[row].amount);
                     break;
                 case "LTC":
                     $("#ltc").text(data[row].amount);
                     break;
                 case "MONA":
                     $("#mona").text(data[row].amount);
                     break;
                 case "LSK":
                     $("#lsk").text(data[row].amount);
                     break;
                 default:
                     console.log("該当なし");
                     break;
             }
         }
      },
      error: function() {
      }
   });
}
Sample.py
資産情報を取得するURLマッピングの処理を追加
import hmac
import hashlib
access_key = "API キー"
secret_key = "シークレットキー"
class GetBalanceHandler(tornado.web.RequestHandler):
u""" メイン処理 """
def initialize(self):
logging.info("initialize")
def post(self):
global secret_key
global access_key
timeout = None
method = "GET"
access_time = str(time.time())
endpoint = "/v1/me/getbalance"
# body = "?" + urllib.parse.urlencode(params)
encode_secret_key = str.encode(secret_key)
encode_text = str.encode(access_time + method + endpoint)
access_sign = hmac.new(encode_secret_key, encode_text, hashlib.sha256).hexdigest()
auth_header = {
'ACCESS-KEY': access_key,
'ACCESS-TIMESTAMP': access_time,
'ACCESS-SIGN': access_sign,
'Content-Type': 'application/json'
}
url = "https://api.bitflyer.jp" + endpoint
with requests.Session() as s:
if auth_header:
s.headers.update(auth_header)
if method == "GET":
response = s.get(url, params=None, timeout=timeout)
else: # method == "POST":
response = s.post(url, data=None, timeout=timeout)
if len(response.content) > 0:
content = json.loads(response.content.decode("utf-8"))
logging.info(content)
self.write(json.dumps(content, ensure_ascii=False))
app = tornado.web.Application([
(r"/", MainHandler),
(r"/ticker", SendWebSocket),
(r"/balance", GetBalanceHandler)
],
template_path=os.path.join(os.getcwd(), "templates"),
static_path=os.path.join(os.getcwd(), "static"),
js_path=os.path.join(os.getcwd(), "js"),
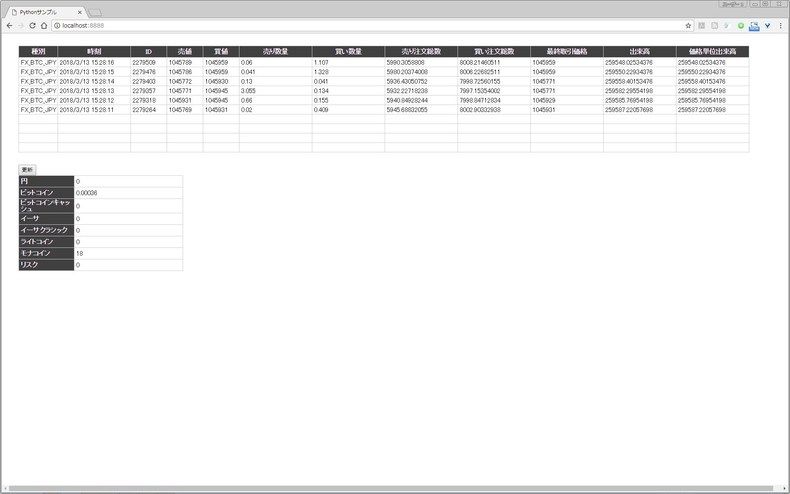
)起動してみる
起動時にとりあえず取得してテーブルに設定するような形にしてあります。
Private API はアクセスの回数など、制限があるためむやみに繰り返し処理をしない方が無難です。
まとめ
あまり使いどころはなさそうですが、とりあえず資産の状況を取得・表示することができました。
次回は注文関係をやってみれたらと思います。
ではでは。